Notification Policy
An alert that fires but reaches nobody is just noise you never heard. The Notification Policy is where you decide which alerts go to which people - so the right team is paged for a production incident, Slack gets a heads-up for a warning, and low-priority rules don't interrupt anyone at 3am.
Navigate to Alerting > Notifications and open the Notification Policy tab.
Advanced configuration
Incorrect changes here may cause missed notifications. Most users should manage contact points from the Contact Points page instead.
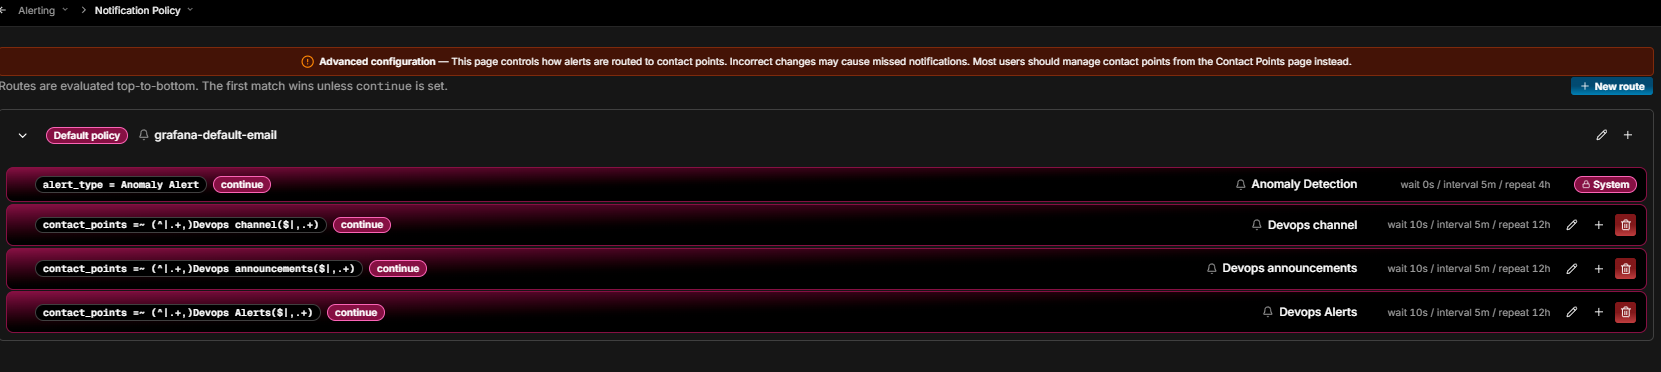
Routes are evaluated top-to-bottom. The first match wins unless continue is set.
How routing works
- Label matching - alerts are routed based on label matchers. Each route checks the labels on an incoming alert to decide whether to handle it
- Top-to-bottom evaluation - routes are checked from top to bottom. The first match wins and sibling routes below it are skipped, unless continue is set
- Continue - when set on a route, the alert continues matching sibling routes after the first match, allowing one alert to notify multiple destinations simultaneously
- Inheritance - a child route with no contact point set inherits the parent's contact point
- Default policy - any alert that does not match a specific route falls through to the Default policy, which acts as a safety net so no alert is silently dropped
Each route in the list shows:
- Label matchers - the conditions that must be met for an alert to match this route (such as,
alert_type = Anomaly Alertorcontact_points =~ (^|.+,)Devops channel($|,.+)) - continue badge - shown when the route is set to continue matching sibling routes after it matches
- Contact point - the destination the alert is sent to
- Timing - wait / interval / repeat values inline (such as,
wait 10s / interval 5m / repeat 12h) - Actions - edit (pencil), add child route (+), and delete (bin). Routes with a System lock badge are managed by the system and cannot be deleted. The + (add child route) opens the same panel as + New route, creating the new route nested under the current one.
Recommended setup
The simplest approach is to use a channel label on your alert rules and match it with a regex route per destination. This keeps your policy tree flat and makes routing immediately visible on the rule itself.
Step 1 - Create a contact point per destination
Go to Alerting > Contact Points and create one contact point for each notification destination. See Contact Points.
Step 2 - Add a route per destination
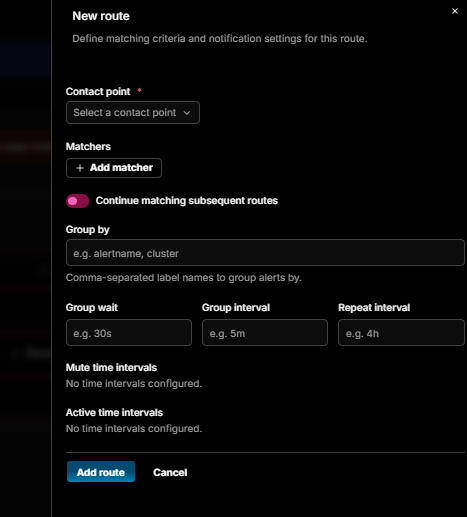
- Click + New route to open the route panel
- Select a Contact point from the dropdown
- Click + Add matcher and define your matching criteria (such as,
channel =~ .*slack.*) - Optionally toggle Continue matching subsequent routes if this alert should also match sibling routes
- Set Group by to the label names used to bundle related alerts (such as,
alertname, cluster) - Set timing values:
| Setting | Description | Default |
|---|---|---|
| Group wait | How long to wait before sending the first notification for a new group | 30s |
| Group interval | How long to wait before sending updates for an existing group | 5m |
| Repeat interval | How long to wait before re-sending the same firing alert | 4h |
- Optionally add Mute time intervals to suppress notifications during specific windows
- Optionally add Active time intervals to restrict notifications to specific windows only
- Click Add route
The result is a flat set of routes, each routing a specific channel label to its destination:
| Route matcher | Contact point |
|---|---|
channel =~ .*email.* |
Email contact point |
channel =~ .*slack.* |
Slack contact point |
channel =~ .*webhook.* |
Webhook contact point |
Step 3 - Label your alert rules
When creating an alert rule, add a channel label with the value matching the destination you want (such as, channel=slack). The matching route handles it automatically.
Tip
Using a regex matcher (=~) rather than an exact match gives you flexibility. A label value of slack-critical will still match .*slack.*, so you can be more specific on rules without updating the policy.
Configuring the Default policy
The Default policy handles any alert that does not match a specific route.
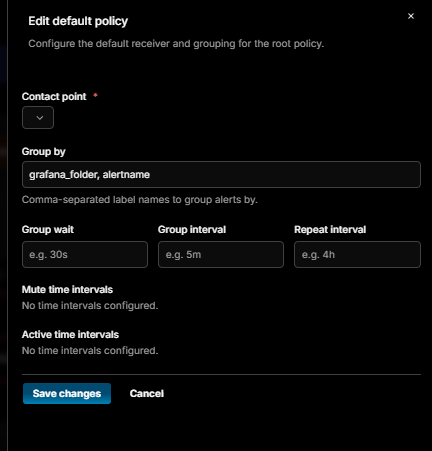
- Click the edit icon on the Default policy row
- Select a Contact point for unmatched alerts
- Set Group by to the label names used to bundle related alerts (such as,
grafana_folder, alertname) - Set your timing preferences:
| Setting | Description |
|---|---|
| Group wait | How long to wait before sending the first notification for a new group (default 30s) |
| Group interval | How long to wait before sending updates for an existing group (default 5m) |
| Repeat interval | How long to wait before re-sending the same firing alert (default 4h) |
- Optionally add Mute time intervals and Active time intervals to control when notifications are sent
- Click Save changes
Applying time intervals
To mute notifications during specific windows, select a time interval from the Mute timings dropdown when editing a route.
Learn more